INSTALLATION, OPERATION & MAINTENANCE INSTRUCTIONS
Series SLEX / REX Explosionproof Sight Lights
UL Listed – Hazardous Location Rated
1. PURPOSE & SCOPE
This page provides installation, wiring, operation, storage, and maintenance instructions for Series SLEX-100, REX-100, and SLEX-HI-LED explosionproof sight lights.
These sight lights are designed to illuminate the interior of:
- Pressure vessels
- Pipelines
- Sight glasses
- Sight flow indicators
Important:
This page must be read and understood before installation or service. Failure to follow these instructions may result in equipment damage, personal injury, fire, or explosion.
2. PRODUCT OVERVIEW
What Is a Sight Light?
A sight light is a rugged, explosionproof lighting fixture mounted externally to illuminate process media through a sight glass.
Key Design Benefits
- Explosionproof construction
- No moving parts
- Simple, reliable operation
- Suitable for hazardous locations
- Available with halogen or high-intensity LED light engines
Typical Applications
- Chemical processing
- Refining
- Power generation
- Industrial fluid systems
- Hazardous classified areas
3. SAFETY INFORMATION
⚠️ GENERAL SAFETY WARNINGS
- Installation and wiring must be performed by qualified personnel only
- Follow local, national, and site electrical codes
- Disconnect power before opening fixture
- Do not install where marked operating temperature exceeds ignition temperature of the hazardous atmosphere
- Keep fixture tightly closed during operation
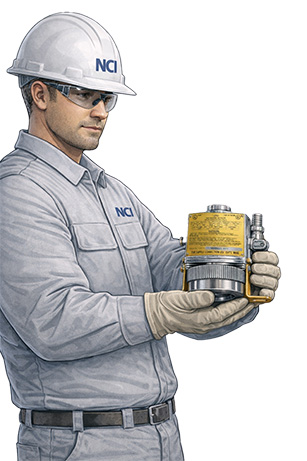
Personal Protective Equipment (PPE)
- Safety glasses (ANSI-approved)
- Gloves (especially during re-lamping)
- Lockout/tagout equipment when servicing
4. RECEIVING INSPECTION
Upon receipt:
-
Inspect packaging for visible damage
-
Carefully inspect the sight light for:
- Cracks
- Bent brackets
- Damaged conduit threads
- Broken lamp or lens
-
If damage is found:
- Do not install
- Notify the carrier immediately
- Contact Northeast Controls before proceeding
5. STORAGE & HANDLING
Storage Guidelines
-
Store indoors whenever possible
-
Protect from:
- Weather
- Dust and dirt
- Corrosive atmospheres
-
Keep in original packaging until installation
Handling Guidelines
- Handle with clean hands
- Avoid placing on dirty or abrasive surfaces
- Lamps are fragile — handle with care
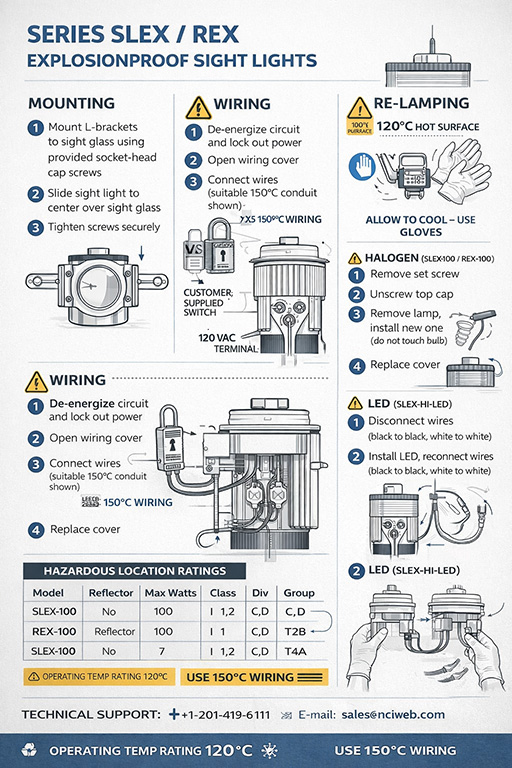
6. INSTALLATION
6.1 Mechanical Mounting
Applies to Series SLEX-100 and REX-100
- Fixtures are supplied with two L-shaped slotted mounting brackets
- Align bracket slots with tapped holes on the sight glass
- Install supplied socket-head cap screws finger-tight
- Center the fixture over the sight glass
- Tighten cap screws securely
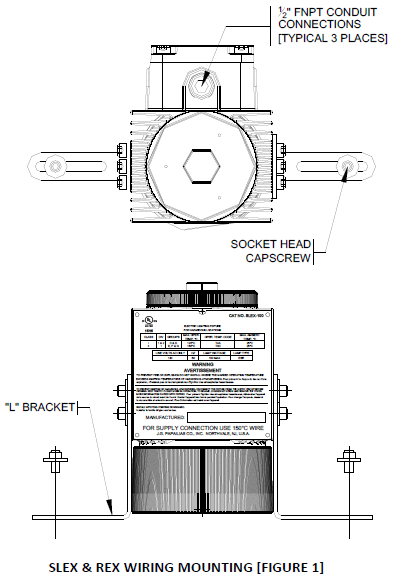
✔ Fixture must be rigidly mounted with no vibration
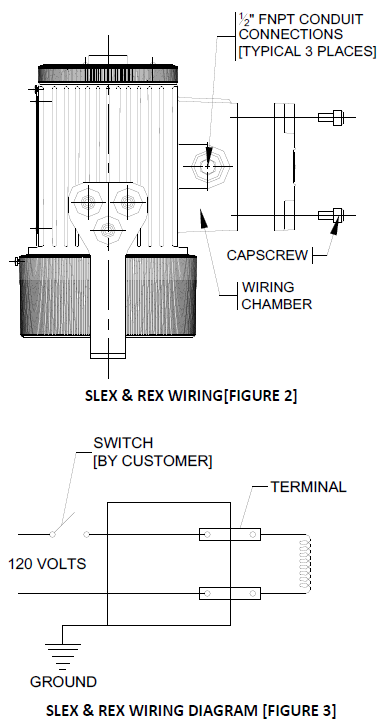
6.2 Electrical Wiring
⚠️ WARNING – HAZARDOUS LOCATION
- Verify supply voltage and circuit rating before wiring
- UL requires supply wiring rated for 150 °C
- Series SLEX / REX are rated for 120 VAC, 60 Hz
Wiring Procedure
- De-energize circuit and lock out power
- Remove cover by loosening the four socket-head cap screws
- Remove a conduit plug from the wiring chamber
- Install approved conduit suitable for classified location
- Make connections using:
- Wire nuts or
- Crimp-on butt connectors
- Grounding is provided through the conduit
- Replace cover and tighten evenly
7. START-UP CHECKLIST
Before energizing:
☐ All mechanical fasteners tight
☐ Fixture properly centered on sight glass
☐ Conduit connections secure
☐ Wiring insulation intact
☐ Cover fully seated and secured
8. OPERATION
- Sight lights do not include an integral switch
- Must be energized using a customer-supplied hazardous-location switch
- May be wired to:
- Momentary switch
- Maintained switch
Normal Operation
Once energized, the sight light provides continuous illumination through the sight glass with no adjustment required.
9. HAZARDOUS LOCATION RATINGS (UL LISTED)
| Model | Reflector | Max Watts | Class | Div | Group | Temp Code | Max Operating Temp |
|---|---|---|---|---|---|---|---|
| SLEX-100 | No | 100 | I | 1,2 | C,D | T4A | 120 °C |
| SLEX-100 | No | 100 | II | 1 | E,F,G | T3C | 160 °C |
| REX-100 | Yes | 100 | I | 1 | C,D | T2B* | 260 °C |
| SLEX-HI-LED | No | 7 | I | 1,2 | C,D | T4A | 120 °C |
| SLEX-HI-LED | No | 7 | II | 1 | E,F,G | T3C | 160 °C |
*Operating temperature may exceed safe limits for some Group C materials. Install only as intended.
10. MAINTENANCE
General Maintenance
- No routine maintenance required beyond lamp replacement
- Inspect periodically for:
- Loose fasteners
- Damaged conduit
- Lens contamination
Spare Parts Recommendation
- Maintain one spare lamp per installed fixture
- Lamps available from Northeast Controls
11. RE-LAMPING PROCEDURES
⚠️ IMPORTANT SAFETY NOTICE
- De-energize and lock out power
- Allow fixture to cool
- Use gloves at all times
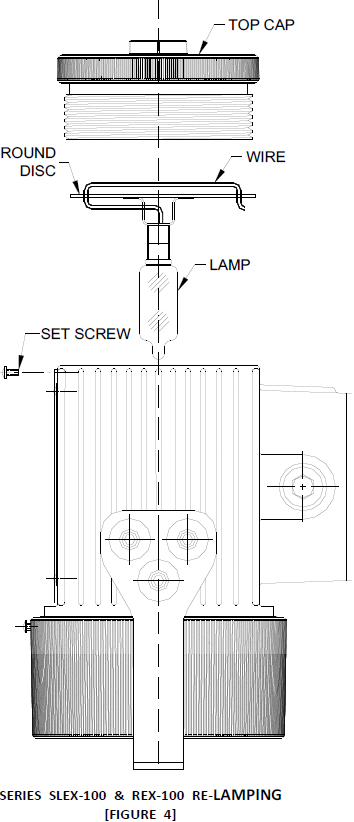
11.1 Re-Lamping – SLEX-100 / REX-100 (Halogen)
- Remove set screw above nameplate
- Unscrew and remove top cap
- Carefully lift lamp disc assembly
- Push lamp inward and rotate counter-clockwise to remove
- Do not touch new lamp with bare hands
- Install new lamp and rotate clockwise until seated
- Reinstall disc assembly and top cap
- Tighten set screw
11.2 Re-Lamping – SLEX-HI-LED
- Connect:
- White-to-white
- Black-to-black
using crimp-tight connectors
- Pull slack wire through back-plate
- Insert LED engine into housing
- Remove front cover and set screw
- Install red silicone gasket
- Insert centering ring (flat side outward)
- Reinstall front cover and set screw